Deploying Strapi App
Strapi is an open source headless CMS built with Node. It comes with a great admin UI that lets your entire team create and manage content for your websites and apps. Strapi makes your content available via an API and can therefore be used in many different ways.
Depending on how you’re using Strapi, your needs will vary when you deploy your project to production. In this blog, I'll show you how to deploy Strapi on Amazon Lightsail.
First things first, you have to have an AWS Console account to use Amazon Lightsail services. If you have already have an AWS Console account you can type on search bar lightsail. Then go to Amazon Lightsail page.
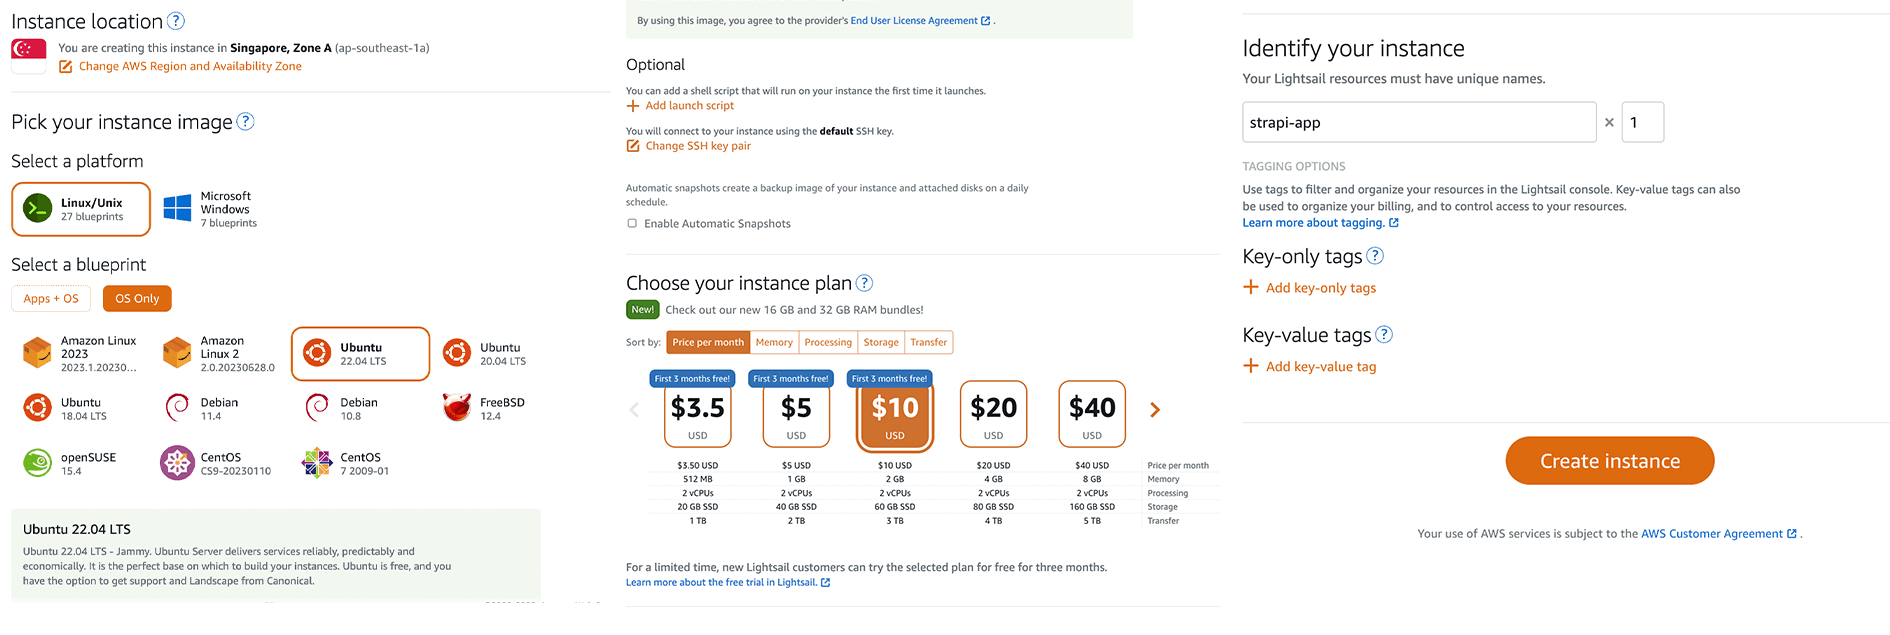
On the Amazon Lightsail page, you can create your instance. I will choose:
- Instance Location: Singapore, Zone A
- Platform: I will select Linux or Unix.
- Blueprint I will choose OS Only, then select Ubuntu 22.04 LTS.
- Instance Plan I will choose Price per Month, then select $10 (2 GB of RAM, 2 vCPUs, 60 GB SSD).
- Last but not least, you can name your instance, then click button Create Instance.
Wait until your instance status changes from pending to running, then you can access your instance using a browser or using ssh. In this blog, I'll show how to connect your instance using ssh from your local laptop or computer.
Connecting your Lightsail using ssh from your local laptop/computer
- Download the default key from your instance page, then locate the file that you have already downloaded in an accessible location. I will locate my ssh key to directory
~/.ssh/on my laptop, then change the permission file to 400.
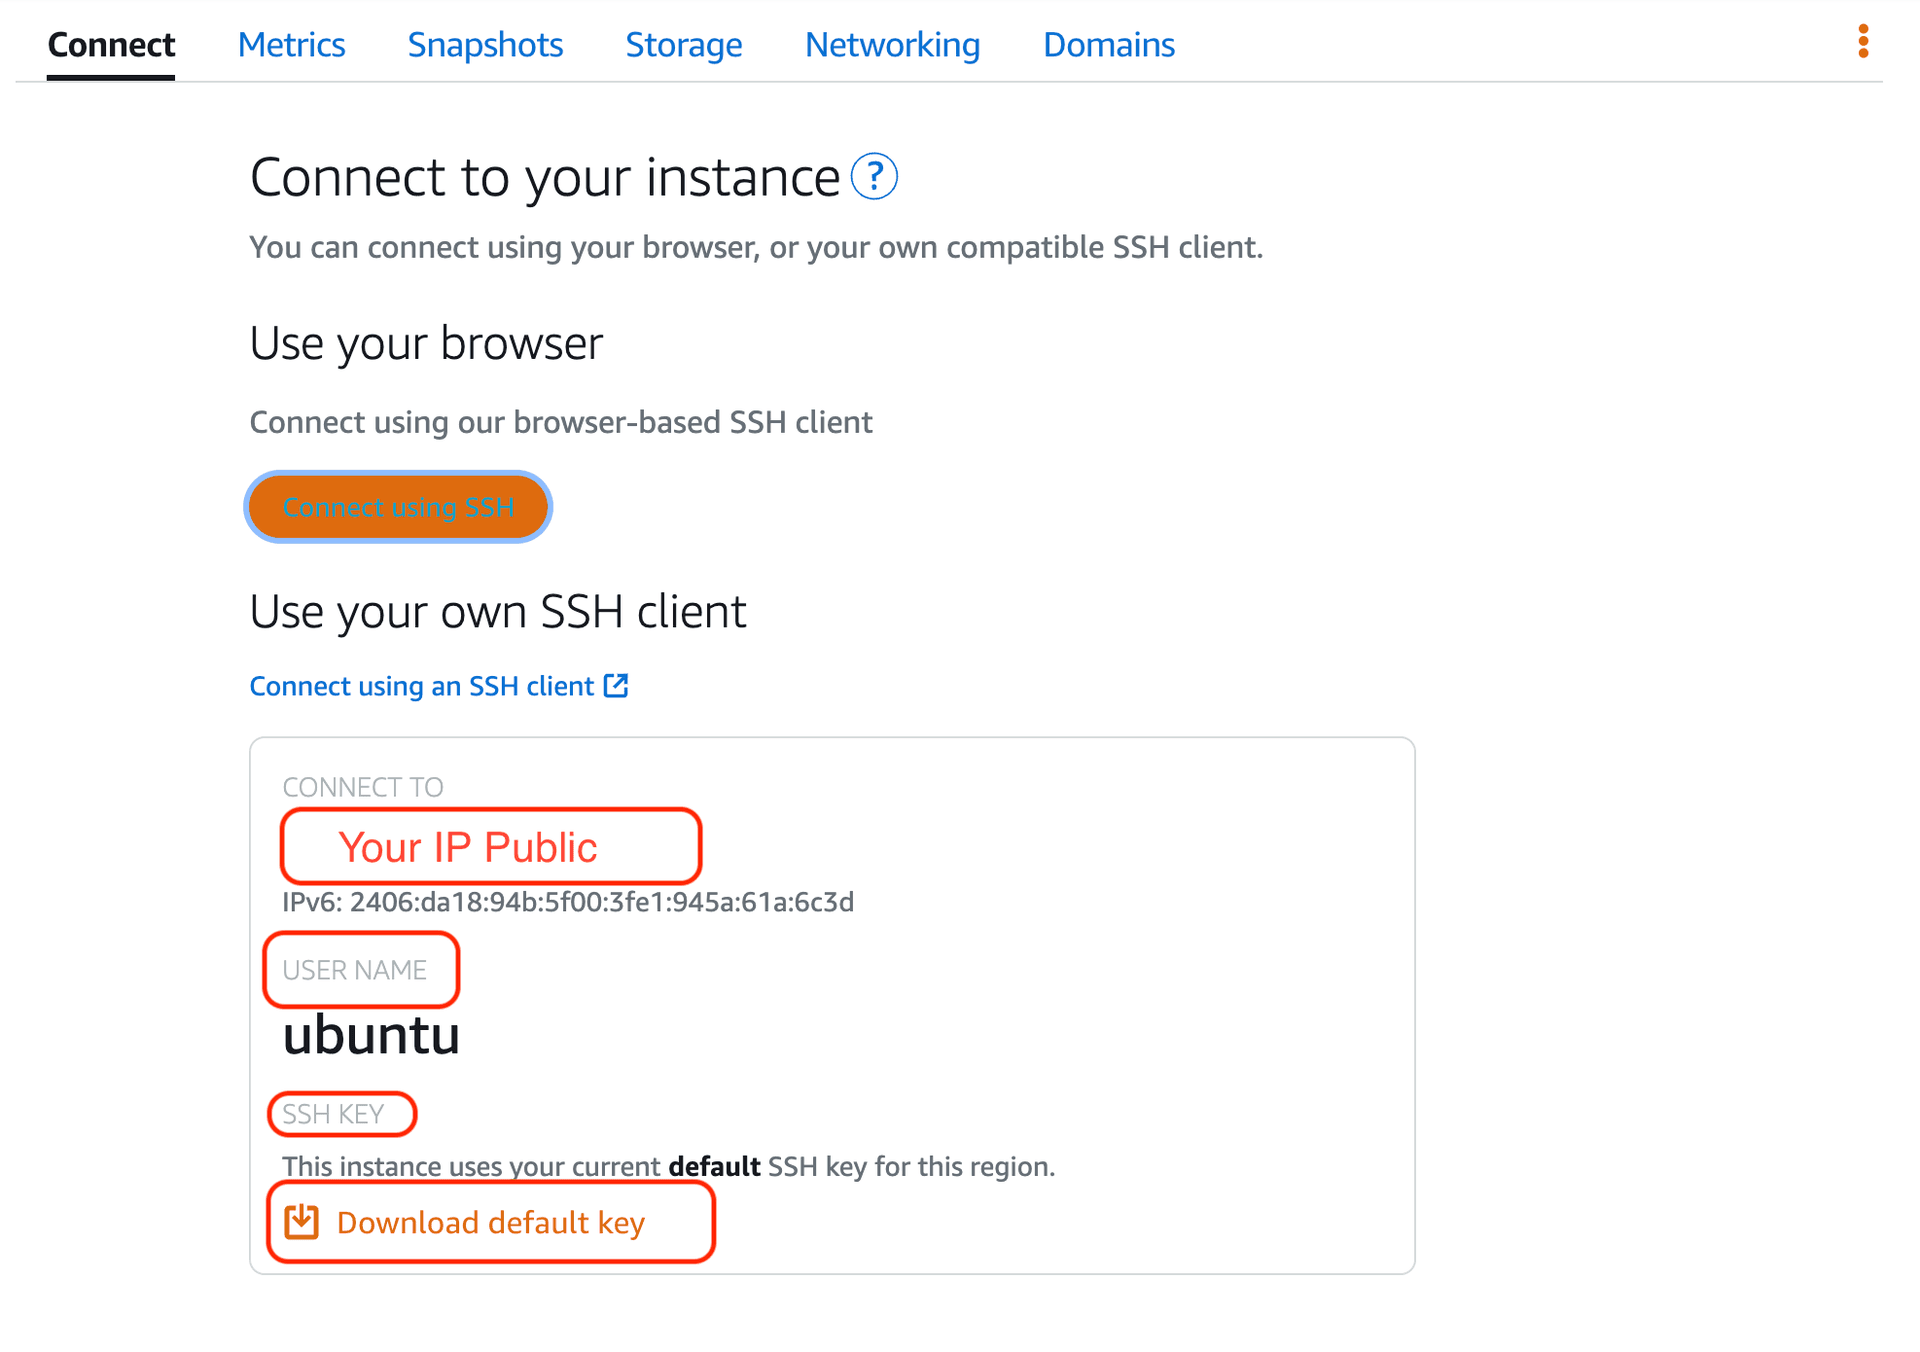
chmod 400 ~/.ssh/LightsailDefaultKey-ap-southeast-1.pem- You can access your instance using this command:
ssh -i ~/ssh/LightsailDefaultKey-ap-southeast-1.pem ubuntu@ip_address, whereubuntuis your username instance, then forip addressis the public IP address of your instance. If there are a questionAre you sure you want to continue connecting (yes/no/[fingerprint])you can typeyesthen pressEnter. Finally you can access your instance from you local laptop/computer 🥳.
Installing Node.js
- I will use Node.js version 18.x.x LTS, type on your terminal this commands to install node.js :
curl -sL https://deb.nodesource.com/setup_18.x -o nodesource_setup.sh
sudo bash nodesource_setup.sh
sudo apt install -y nodejs- You can check your node.js was properly installed using this commands
node -vandnpm -vto check your node version and npm version.
For more information about how to install node.js on your instance, read the documentation.
Setup Database using PostgreSQL
This is not recommended for installing databases on your app server, you should separate your app server and database server. But in this blog, I'll use the same server between the app and the database.
- I will use PostgreSQL version 14, type on your terminal this command to install PostgreSQL :
sudo apt install postgresql postgresql-contrib - You can using this command if your postgresql already running :
service postgresql status - Setup password for user postgres and create database using this commands:
sudo -u postgres psqlto launch the PostgreSQL interactive terminal as the user "postgres" with superuser privileges.\password, it will prompt you to enter your password and password confirmation for Postgres users. Your password does not appear as you type it.CREATE DATABASE api;, it will create database with nameapi.\c api, it will connect to your database.\q, to exit from PostgreSQL interactive terminal.
- Finally your database is ready to use 🥳.
For more information about how to install a PostgreSQL database on AWS RDS, read the documentation.
Deploy from GitHub
Deploy your app to your Lightsail instance by cloning it from GitHub. In this blog I'll use a personal access token GitHub to clone my app.
- You can generate your personal access token from your github account on menu
Setting -> Developer Setting (Bottom Side Menu) -> Choose Personal Access Tokens -> Tokens (Classic) -> Generate New Token (classic) -> Give note for your token, choose expiration time, and checklist scopes -> Done - Go to terminal server, create directory project using this command:
mkdir projects. - Go to github repo your project copy url your project on tab https.
- Back to terminal server, using this command clone your github repo to server:
git clone https://github.com/user-github/github-repo-project.git, then copy/paste your personal access token when it prompts to input username/password. - Navigate to your directory project
github-repo-project, then runnpm installto install the packages for your project. - Done, you have already clone your project to your app server and install all packages for your project 🥳.
Installing PM2 Runtime
PM2 Runtime allows you to keep your Strapi project alive and to reload it without downtime.
- Install PM2 globally
sudo npm install pm2@latest -g - Run these commands to navigate to your home directory and generate a boilerplate file
ecosystem.config.jsthen edit it usingvi
cd ~
pm2 init
vi ecosystem.config.js- Next, replace the boilerplate content file, with the following :
module.exports = {
  apps: [
    {
      name: 'your-app-name', // your project name
      cwd: '/home/ubuntu/project/github-repo-project', // Path to your project
      script: 'npm', // For this example we're using npm, could also be yarn
      args: 'start', // Script to start the Strapi server, `start` by default
      env: {
        NODE_ENV: 'production',
        DATABASE_HOST: 'localhost', // database Endpoint under 'Connectivity & Security' tab
        DATABASE_PORT: '5432', // port your database
        DATABASE_NAME: 'db-name', // db name that you have created
        DATABASE_USERNAME: 'postgres', // default username
        DATABASE_PASSWORD: 'db-password', // password for user postgres that you have created before
        AWS_ACCESS_KEY_ID: 'aws-access-key-id', // optional if you are using S3 for store your images/documents
        AWS_ACCESS_SECRET: 'aws-access-secret', // optional if you are using S3 for store your images/documents
        AWS_REGION: 'aws-region', // optional if you are using S3 for store your images/documents
        AWS_BUCKET_NAME: 'aws-bucket-name', // optional if you are using S3 for store your images/documents
      },
    },
  ],
};- Then start
pm2, don't forget to setup your .env in your project, and make sure all packages already installed using this commandnpm install, then build app using this commandnpm run buildon your directory github-repo-project.
cd ~
pm2 start ecosystem.config.js- Now you can access your app using ip public your instance with port 1337 for example http://ip-public:1337, don't forget to add new rule inside
IPv4 Firewallon tabs Networking at instance page, that allow your port accesible for public (see image below).

On the next blog I'll show you how to setup NGINX so that you can access your app using your own domain, and install SSL using Certbot by Let's Encrypt